|
It's the season for squashes! This year I planted way too many Butternut Squash so now I have an abundance of these buggers. I love to grow them because they are super easy to grow and they store for a very long time. Plus, you can make some delicious foods with them! Here are a few tried and true recipes that I have found that taste soo good and are excellent ways to use up your bumper crop of Butternut Squashes! Better Than Pumpkin Pie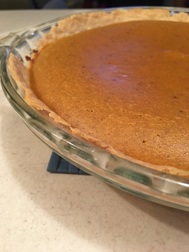 This is a very good pie to make and it's very similar to pumpkin pie. I like making it to use up my butternut squashes ! Jean's Butternut Squash SoupButternut Squash CasseroleRoasted Butternut SquashButternut Alfredo Sauce
0 Comments
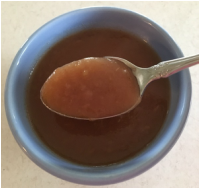 There are two ways to make this easy, delicious applesauce, on the stove and in the crock pot. I prefer to use the crock pot since allowing it time, gives me the chance to not have to use my hand blender. Ingredients:
4 apples, peeled, cored, chopped (Cortland apples are perfect for this recipe) 3/4 cup water 1/4 or less of white sugar (depending on the sweetness of apple you are using) 1/2 teaspoon ground cinnamon Stove Top Directions: 1) In small saucepan, combine apples, water, sugar and cinnamon. 2) Cover and cook over medium heat 15-20 mins or until apples are soft. 3) Allow to cook, then mash with potato masher or hand blender until desired consistency. Crock Pot Directions: 1) Double the recipe. Place all ingredients in slow cooker. Cook on high 3-4 hours. 2) Mash apples with potato masher or just eat as is! Note: If doubled, half of this applesauce can be placed in a freezer bag and popped into the freezer for later. Thaw in your fridge day before eating. Any extra you don't eat, you can also place in your fridge for up to 3 weeks. Enjoy! 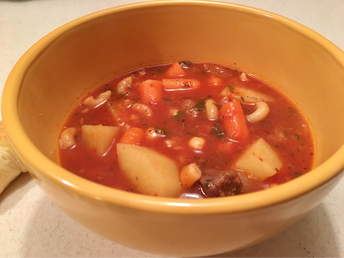 This is my mom's recipe for minestrone soup. It's delicious and so hearty and rich! I usually double the Recipe and freeze half of it for those cold winter days :) Ingredients:
1 package stew beef 1/2 cup flour dash of salt and pepper 1 Tablespoon olive oil 2 teaspoon olive oil 1 medium onion, diced 2 cloves garlic, minced 4 cups broth ( veggie or beef ) 1 (15oz) can tomato sauce 1 can garbanzo beans, drained and rinsed 2 medium carrots 1 medium zucchini, chopped 1 large potato, chopped 1/4 cup fresh parsley 1 teaspoon basil, dried 1/2 teaspoon thyme, dried 1/4 teaspoon pepper salt to taste 1/2 cup uncooked elbow macaroni 1) Put flour and salt and pepper in ziplock bag, shake and place stew beef in bag one at a time. Shake bag with each beef your drop in the bag to coat all sides of meat. 2) Once all the meat has been coated, heat a cast iron skillet on medium heat until hot. Add 1 Tablespoon olive oil and coat pan. Add your beef one at a time at least 1/2 inch apart and brown on all sides. 3) Meanwhile, get a stock pot and heat on medium heat, add the broth and the beef that is cooked, followed by your spices. 4) Once beef is finished cooking, wipe out skillet with paper towel and add your 2 teaspoons of olive oil on medium high heat. Once oil is hot, add chopped onion and garlic and sauté for 3-4 mins. 5) Now add the cooked onion and garlic to the stock pot along with all of your chopped veggies, beans and tomato sauce. Heat on medium heat for 15 mins, you should have a nice steady simmer, stir occasionally. 6) Increase heat until soup reaches a cheerful boil. Add macaroni and cook another 20 mins. Enjoy! 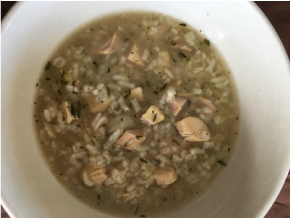 This is a hearty, simple and comforting soup to make during the winter months. I love taking leftover chicken from chicken stock and adding it to this dish. I have the crock pot version and the stove top version, both are delicious! It makes a big batch and it's great to freeze :) Crock Pot Ingredients: 1/2 cup uncooked wild rice 1/2 cup uncooked long-grain white rice 1 Tablespoon veggie oil 5 1/4 cup chicken broth 2 teaspoons thyme 1/2 teaspoon salt 1/4 teaspoon black pepper 1 medium onion, chopped 1 lb raw chicken, cubed 1) Stir rice in oil in slow cooker, cover, cook on high for 15 mins. 2) Add the rest of the ingredients, cover, and cook for 4-5 hours. Stove Top Ingredients: 1/2 cup uncooked wild rice 1/2 cup uncooked long-grain white rice 1 Tablespoon veggie oil 5 1/4 cup chicken broth 2 teaspoons thyme 1/2 teaspoon salt 1/4 teaspoon black pepper 1 medium onion, chopped 1 lb raw chicken, cubed or 1 lb cooked chicken, cubed 1) In a large stock pot, cook rice according to package directions. Empty rice in large bowl to set aside. 2) In that same stock pot, wipe out rice completely, and either cook your raw chicken until done in veggie oil, or add already cooked, leftover chicken to the stock pot later. 3) If you did cook the cubed chicken, set it aside with the rice and add your diced onion to the stock pot and cook until transparent and cooked. About 5 mins. 4) Once onions are cooked, throw in all of your ingredients, including the cooked chicken and rice. Cook on medium-low heat for at least an hour to marry the flavors. Add salt and pepper as needed and serve. Enjoy!  This is a great beginner recipe if you are new to your bread machine and it is soo good! It makes 2 nice sized loaves and I usually freeze the other one to save for a soup day to have it on the side:) Enjoy! Ingredients:
1 cup water 2 1/2 cups bread flour 1 Tablespoon white sugar 1 teaspoon salt 1 1/2 teaspoons bread machine yeast For coating: 1 egg yolk and 1 Tablespoon water mixed together 1) Put wet ingredients in your bread pan first, followed by your dry, then the flour. 2) Add yeast by making a well in the flour and pouring your yeast in the well. 3) Set your bread machine to dough cycle and push start. 4) Once dough cycle is done, it will rise for a while in your bread machine until it lets you know that it is done. Take dough out and place on a lightly floured surface. Split the ball of dough into 2 and mold them gently into 2 separate long loaves. 5) Place both loaves on a sprayed (canola oil spray or any non stick spray) baking sheet spaced apart from each other,covered gently with a clean wet dishrag and let rise for 30-40 mins or until doubled in size. 6) Once it has risen, preheat oven to 375 degrees, remove towel, and just before sticking into the oven on the middle shelf, put your egg wash on the loaves. Cook for 20-25 mins or until golden brown and another way to know it is done, is when it makes a hollow sound by knocking on it. Enjoy! Note: This french bread is great for making: sandwiches, french toast, Paninis, and homemade croutons! I love to make this stock, it uses up a single leftover chicken carcass and turns it into stock for another meal! You can also start saving your used up chicken bones and throwing them into a freezer bag until it's full and throwing that into the crock pot too. I made a chicken roast the night before, cleaned off the bones as best as I could, and saved the meat for another meal, then tossed the carcass in a baggy and popped in the fridge. Here is what you do with that leftover carcass, and you can do the same for a turkey carcass, just add more water to cover, add more veggies and chicken seasoning. It makes a ton of stock! Recipe for this without pictures is here. Ingredients: 2 1/2 lbs bone in chicken-pieces 6 cups water 2 stalks celery, chopped 2 carrots, chopped 1 onion, quartered 1 Tablespoon dried basil dash thyme dash bay leaves Step 1) Clean your veggies, take the carrot skins and veggie scraps and place in your freezer veggie stock bag to make veggie stock once it's full. 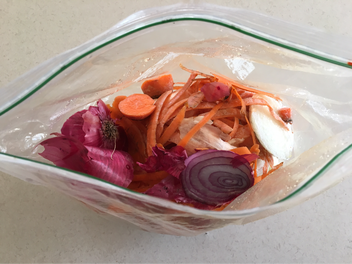 Then cut the veggies and place in slow cooker ( as you can see I have some frost bitten celery from my freezer that I added ;) ) 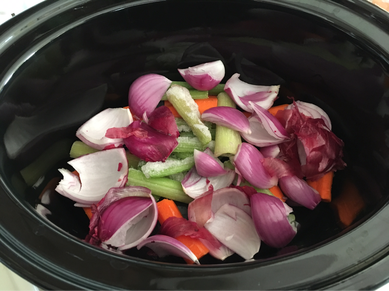 Step 2: Add your herbs and chicken carcass or bones, then pour in your water. 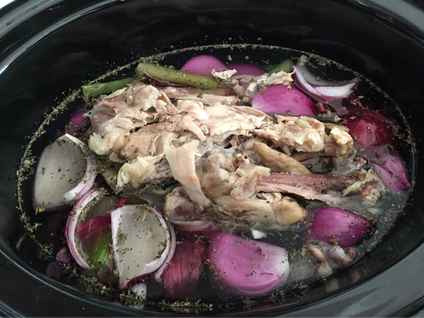 Step 3: Turn on your crock pot to low and cook 8-10 hours....the longer the better! If you're short on time, you can turn it on high for 4-6 hours but believe me, time is your friend here. You want the broth to get a nice rich deep flavor and the more geletin in it, the better body this stock has for meals. Step 4: After the time has passed and the stock has a nice dark, rich color, you will want to turn off your crock pot and let it cool for an hour at least so that you can handle it. Step 5: Strain your stock. To do this, separate the veggies and bones from the stock using a colander. I use 3 bowls. One for the bones and veggies, one for the stock, and one for the meat that I remove from the bones. This pic shows the strainer in the stock bowl. I use a ladle to remove the bones and veggies and press the back of the ladle down to squeeze out all the excess juice. 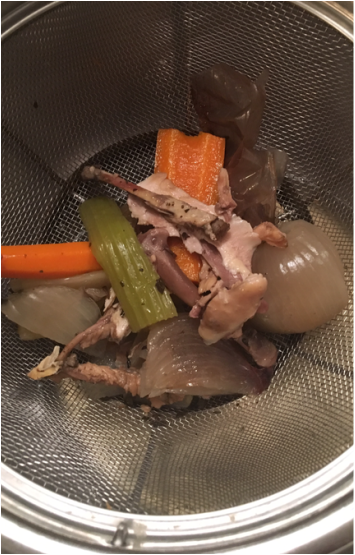 This bowl below depicts the strained veggies and bones. 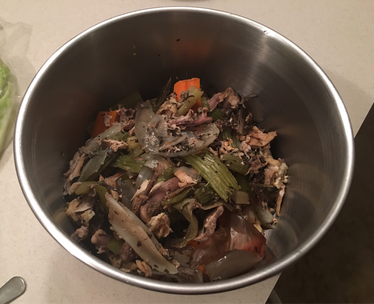 Below is the meat stripped from the bones that can be made into sandwhiches or put in the freezer for another meal. I like to do this with every batch Of stock I make so that when I have enough, I can use it to make chicken pot pie! 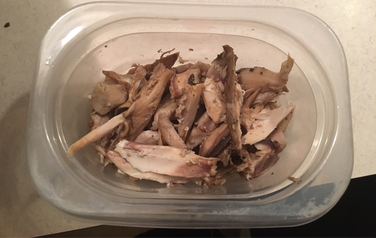 Step 6: Once your stock is strained, you can cover the top of the bowl in plastic wrap and place in the fridge overnight for the fat to raise to the top. Step 7: The next day, your stock should look like this... 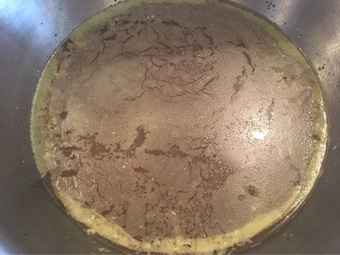 Pretty right? No...not at all. That's the fat on top. You can either scoop off the fat and throw it out OR save it. I scrap the fat off and put in ice cube trays and stick that in the freezer to use for chicken based recipes in place of using oil! It adds such a complexity to your chicken dishes, try it out! It should look like this once placed in ice trays. 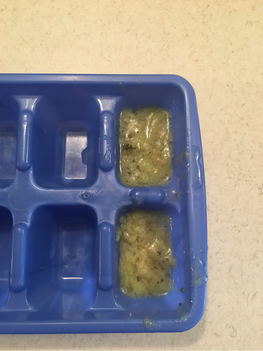 Step 8: Once you have gotten rid of the fat, you can start bagging it! I have found that the easiest way to do this is using a container like a tall measuring, baggies, a funnel, and a ladle. Like in this pic. 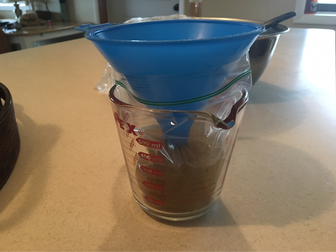 Fill your baggies leaving about 2 inches headspace ( since your stock will expand when it freezes) and place in your freezer door to keep from spilling. Or you can put the stock in Tupperware :) just remember to label. The stock lasts up to 6 months in the freezer. 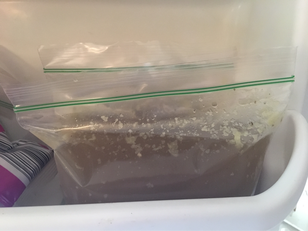 Well, that does it! Any questions just be sure to comment and happy cooking!
This year, I have a ton of banana peppers from my two banana pepper plants. I grew them for my hubby since he loves pickled peppers, so this year I made pickled peppers for the first time and wow is it easy! No Canning involved! Whoop whoop! I do love to can but after doing it all summer long, I grow tired of it (gasp!) so here is the recipe for pickled peppers!  Ingredients:
6 cups clear vinegar, 5% acidity 2 cups distilled water, not tap 1/2 to 2 cups sugar, depending on preference Seasonings can vary depending on taste: garlic, bay leaf, basil, doll, or leave plain Lots of banana peppers, washed, sliced up and deseeded or left whole with slit down the center 1) Wash and slice up peppers. 2) Wash and dry canning jars and their lids. 3) Place peppers in prepared canning jars with seasoning of your choice. 4) Prepare the Brine: place brine ingredients (water, sugar, vinegar) in non-reactive pan (either stainless, enameled or anodized aluminum, not the old fashioned aluminum pans). 5) Bring brine to a boil, stir and turn off heat. 6) Pour hot Brine on peppers to cover. Seal lids and bands and let cool away from drafts. For storage, store away from heat and light. Note: there is no need to process these since the vinegar (using 5%) keeps the bacteria out! Enjoy! Have you ever bought a loaf of bread and couldn't finish the whole thing in time and it went moldy? Or have you ever seen a sale on bakery items but thought, " oh I won't use that up in time before it expires. Never mind." Or have you ever made a huge helping of spaghetti sauce or Chicken Alfredo and thought," what do I do with all these leftovers? We can't finish all this in a week..." Then welcome to freezing!
Here are the first steps for getting into the wonderful world of freezing. 1) Get good Tupperware...ones that say you can put them in the freezer and thick ones, not flimsy ones you get at the dollar tree. The food you store in them will keep longer and have less of a chance of getting freezer burn, quicker. 2) Buy freezer bags. Don't use ones that are not for freezer use or, hello freezer burn. 3) If you don't have the freezer space, invest in a chest freezer. This will help you a lot with setting up your kitchen for winter surpluses and for freezing garden surpluses. 4) Have masking tape and a marker to write the item contents and date on each Tupperware. Now that you have all this fun stuff, you can start freezing! Here's a list of what you can freeze. 1) Breads-includes all breads (hamburger buns, Beagles, sliced bread etc.) If it's a fruit based bread like: banana, apple, pumpkin, I recommend you wrap the cooled bread in aluminum foil first, then place in a freezer bag. 2) Dairy Products, such as: Ricotta (consistency might be a little waterier) but it's great for lasagna, butter (left in packaging), cheeses (left in packaging), and cream cheese (watery consistency but great for baking and cooking purposes). To do this, just pop in the freezer as is or separate packages and freeze in bags (for instance; you bought a big package of sliced Swiss cheese at Sams Club and need portions broken down because no one is going to go through 50 slices of Swiss in a month. ) 3) Dinners-you can freeze basically all dinners but if it's a dinner that should have noodles (like Chicken Alfredo or spaghetti) leave the noodles out. The freezing will change the consistency of the noodles to mush and that's not yummy. Just Freeze the sauce. Also, dinners that contain potatoes don't freeze too well if the potatoes are formed. If the potatoes are mashed like in Potato and Bacon Soup, then by all means, freeze! but if they are in chunks, the consistency might be a little mushy. But it will still taste good :) 4) Veggies- Some veggies need to be blanched first, like fresh green beans, or snap peas. But some veggies are just fine washed, towel dried and frozen in a single layer on a baking sheet then popped into the freezer ( like my celery blog entry states ) and then added to freezer bags. The Veggies you can do just that, are: whole tomatoes, sliced or quartered peppers, sliced or grated zucchini, and cut up butternut squash. Those are the veggies I've tried and tested and they work out great! 5) Fruits- some fruits should be put in a mixture of lemon juice and water to preserve them better in the freezer. This is usually done with peaches and apricots since they are so high in acidic properties. To do this, just slice up the peaches or apricots, skins and all, place in a Tupperware and add a Tablespoon of lemon juice and fill with water to cover fruit and freeze. Then there are some fruits that can just be washed, dried and lined on a baking sheet to freeze individually then popped into freezer bags. This list includes: Bananas, Strawberries,Blueberries, Cherries, Blackberries, and Raspberries. 6) Fruit and Veggie Based Sauces- This list includes: Applesauce, homemade or jarred Tomato sauce, cooked pumpkin puree, cooked butternut puree, and Tomato Paste. To do this, place the contents in a Tupperware and label. That's it! 7) Stocks- Veggie, chicken, rabbit, and turkey stock. To do this, measure out the cooled stock in a large measuring cup and ladle with a funnel into small freezer baggies. Label and date, as well as listing the cup amount. Stand up on a freezer door to help it freeze without spilling over. 8) Baked Goods-Whole frozen pies (I've only done apple), cookies, muffins, cakes, homemade rice crispy treats, fudge, scones, chocolate chips, and brownies. 9) Raw Dough- pizza dough, bread machine dough (any kind) and cookie dough. To do this, wrap the dough in plastic wrap individually, then place in a freezer bag and label. 10) Herbs- Dried herbs. After drying your herbs from the garden by placing on paper towels or hang drying, place the herbs in a freezer bag and label. 11) Meat- Any meat, raw, place in freezer bags. Cooked meats such as: shredded chicken, hamburger meat, place in Tupperware and label. Sausage and Bacon can be frozen in its package. 12) Misc Items: Dried fruits (left in package), baking yeast (left in package then in baggie), coffee (in package or in baggie), nuts(baggie or left in package), gravies (Tupperware), whole raw eggs (Tupperware), washed veggie scraps (baggie)and bones for stocks (baggie). If you'd like to keep a freezer inventory, check out this link! Thank you Debbie for your comment email :) So as you can see, there is plenty you can freeze and save for later! Any questions about freezing, please leave a comment at the bottom and I'll be sure to respond, happy freezing friends! Over the years I have learned that having a helpful kitchen appliance or gadget, can make frugal living fun! It started when I got a small, 3 quart crock pot for my wedding shower. Then I learned from my mother in law about bread machines, (a must have in my book), and then the cast iron skillet (thank you dad), and I could keep going. I'm going to show you my favorite appliances, cookware, and gadgets that will spark a creative, cooking, saving feeling inside of you :) The Crock Pot Love love LOVE the crock pot! There are so many soups, dinners, sides, desserts and stocks to make in your crock pot. and so easy to clean up! There are some that are super cheap and some that are super stupid expensive...I got the middle quality ones because I'd rather buy an appliance once if I can manage it. This one is my smaller crock pot. It's a 3 quart and I also have a 6 quart. The 3 quart is perfect for two people. I have made many soups and sauces in this guy and it's a gem. The 6 quart is perfect for roasts and stock. Sometimes I make mac n cheese in it and that makes a huge batch to freeze. Definitely get these guys either used at a goodwill or a garage sale, or new on Amazon because they will save you a lot of money in the long run! 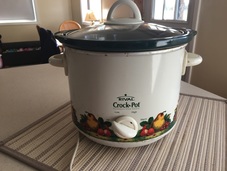 Bread Machine I could go on for days talking about my bread machine...I love it. It has made my life SO much easier with making pizza dough, french breads, raisin bread, dinner rolls, sweet rolls, sub rolls, the list goes on! So this is my second bread machine. The 1st one I had was a wedding present and it bit the dust 5 years ago...probably worked him to death. So I had to replace it with this guy who works great too! I bought him on Amazon and it was around 60 bucks new. It makes up to a 2 lb loaf and it's by Kenmore. You can find these used at Good Wills, garage sales, but make sure it's in good condition and not on its last leg or you will be replacing it again in no time. It has a lot of fancy settings but honestly, I just use the dough cycle. Most recipes, you only need to use the dough cycle but they come with user manuals with recipes so you could really have fun with it if you wanted :) Mines been through 4 moves, so it's in rough shape on the outside but it still works like a charm! 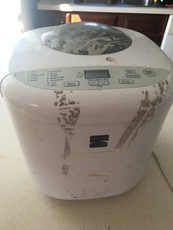 Cast Iron Cookware I loved my 9'' cast iron skillet so much that I bought 2. They are super durable and every time I cook on one, they make my fries crisper, my chicken have a more flavorful glaze and char to it, and you can even bake pies in them since they are oven safe. They also retain heat the most efficiently compared to any other cookware, so you use less energy when you cook! I bought mine new for $20 at Gander Mountain, I believe it is Lodge brand. They are pretty low maintenance too after you follow the manufacturers directions on seasoning them. After I cook in one, I wipe it out with a paper towel as best as I can, then I use a tiny amount of dish soap and water to clean the gunk off of it. Then hand towel dry completely and immediately spray the areas you just dried with cooking spray to keep it from rusting. Done. They say they last for years and so far, both of mine have! Just one warning, don't heat up your cast iron skillet on too high heat for too long, or they may crack, and that's no fun :( 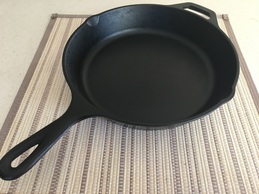 Ceramic Coated Cast Iron Dutch Oven This is another wonderful cooking item I own that I highly recommend. I like the ceramic coating because it doesn't rust as easily as the just cast iron dutch ovens do, and it looks pretty. They are lower maintenance and they can tolerate soap better than the cast iron ones. I use mine for making sauces over the wood stove ( if you have a wood stove that you can cook directly on the top, this is so handy!) and for cooking soups and roasts. They can cost from $30 to $80 depending on the brand. I went with the $30.00 since there are no motors or batteries to worry about...so why not go with the best deal? Click here for the exact one. 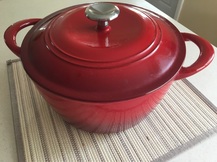 Canning Set If you've always wanted to preserve your own peaches, tomatoes, peppers, etc., then canning is a good place to start. You will save so much money canning your own food and it costs basically nothing if you are canning your garden. If you don't have a garden, or didn't yield enough of something that year, you can still can and it will still save you money. I go to farmers markets and roadside stands when I didn't plant something that year or didn't have enough of the produce to can. You can buy the whole set (minus the jars) brand new for around $50, here. Or you can buy everything separately. I was given most of my canning jars, but there are always canning jars for sale in the penny saver, craigslist, garage sales, just to name a few. I've even seen some free on the side of the road! Just make sure they don't have nicks and breaks or they will be useless. Of course you can buy them brand new too, like I did at Tractor Supply or Walmart too when they are on sale. The most common sizes are Pints and Quarts. The lids and bands are dirt cheap too. I found mine at Big Lots believe it or not, on sale. The citric acid is a must when canning tomato based recipes. The tongs are super helpful and cheap. And the funnel I bought on sale at Tractor Supply, and that helps make the process easier too. The most important item to buy besides the canning jars, is the stock pot that comes with the canning rack. It is designed for canning and not so expensive for an item that lasts forever, Mine was $40, at you guessed it...Tractor Supply but they are sold at other farm stores and department stores. After you have all the items, all that's left is buying the delicious fruits and vegetables to can and a handy recipe! 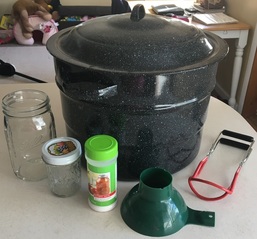
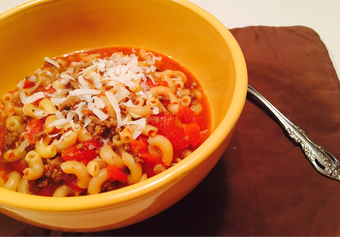 This is a super easy dish, perfect on a weeknight! Serves: 4 Cook Time: 20 mins Ingredients:
11/2 lbs ground beef-80% or higher 1 medium onion, chopped 1 (8oz) package elbow macaroni 2 cups beef broth 1 (14.5 oz) can diced tomatoes 1 (8oz) can tomato sauce 2 teaspoon garlic powder 1 teaspoon salt 1/2 teaspoon ground black pepper 1 Tablespoon shredded Parmesan cheese 1) In a soup pot over high heat, brown hamburger meat and onion until browned, about 6 mins. Stir frequently. 2) Mix in the rest of the ingredients and bring to a boil. Reduce heat to medium/low, cover, and simmer 7-8 mins, or until macaroni is tender. 3) Sprinkle with Parmesan cheese and serve immediately. Enjoy! |
MarianI'm a lover of nature, food, and creating. Archives
January 2021
Categories |
 RSS Feed
